Calm Water Surf/Preparing for the Surf Zone
By Wayne Horodowich
There are a number of excellent articles discussing surfing techniques and how to handle the surf zone ("Ins & Outs of the Surf Zone" by Haack & Soares SK Spring 87, "The Surf Zone: Advanced Techniques" by Soares SK Winter 89, "Surf Zone Techniques for Ocean Kayakers" by Lull SK Summer 91 and the most recent "Surfing for Sea Kayakers: An Introduction" by Foster SK October 99.) The information in these articles is invaluable. However, I feel more attention should be paid to the most essential skill in the surf zone which is side surfing.
Handling the surf zone is dependant upon the ability of staying upright when hit by a wave while in a broached (side-ways) position. If a kayaker cannot learn this skill they will never feel comfortable or be very successful in the surf zone because sooner than later all kayaks end up broached with a wave upon them. In addition to remaining upright after the initial impact, knowing how to side surf to shore while balanced over your kayak is vital to your success in staying upright.
I have seen a great deal of anxiety on the faces of students just prior to their first encounter with the surf zone. I have often wished I had a way to better prepare students for the surf zone. The usual dry land drills never seemed to get the results that I wanted. I needed a way to simulate the feeling of getting hit by a wave while in the broached position. I wanted to have a drill that could be taught in calm water that would simulate the forces of wave impact and side surfing so the student would know what to expect before entering the real surf zone. I often wished for a wave machine in the campus pool so I could teach surf in a controlled environment. . I am happy to say I have found a way to simulate that feeling with the aid of my rescue sling instead of a wave machine.
In order to appreciate this calm water drill we need to analyze what happens when we are hit by a wave while we are in a broached position in our kayaks. Anyone who has survived side surfing or teaches surf classes knows the key to success is a combination of edging your kayak and bracing. Most people who are asked how to take a wave when broached will respond lean and brace into the wave. While this statement is correct I feel not enough depth is given to this explanation. I want to commend Nigel Foster for his explanation of what happens when hit by a wave when broached in his Getting Started section of his October surfing article. When in a broached position in your kayak the most important element to your success in staying upright is the edging of your kayak. If you do not edge your kayak with the top deck toward the wave you will capsize when hit. Sitting straight up in the kayak with no edging is a guarantee capsize. Edging the kayak in the wrong direction (top deck away from the wave) not only means a capsize, it means a very fast capsize.
After edging your kayak the next piece of the equation you need is a brace to keep yourself upright after impact and to help get your upper body back over the balance point of your kayak while it is still edged and side surfing toward shore. Lets look at what happens when we are hit by a wave while in our kayak.
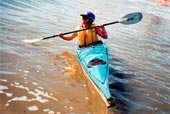
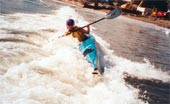
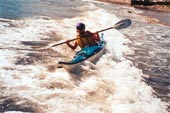
In photo A, the kayaker is ready for the wave to impact the side of the kayak. The kayak is edged correctly. Keep in mind the larger the wave the greater the edging that is needed. Notice the upper body is balanced over the boat. Upon impact of the wave (photo B) the kayak is knocked out from under the upper body of the kayaker. This leaves the kayaker ready to fall into the water on the wave side. This is when the brace is needed. The brace keeps the kayaker from going under. The brace also provides the kayaker the opportunity to get their upper body balance over their kayak again. The sooner one can re-balance over their kayak (photo C) the more control the kayaker will have while side surfing towards shore.
In big waves edging alone isnÕt enough. I have had to throw my body into powerful waves with paddle in brace position so I wouldnÕt capsize. After the impact of these large waves I was able to regain my balance over my kayak but I still had to maintain the edging as I moved quickly towards shore.
One of the great aspects of side surfing is the lift the water dynamics provides to the kayakerÕs brace. The faster the side surf the more powerful the lift on the paddle. As the power of the wave dissipates the lifting power on the paddle also decreases which means the kayaker had better be balanced over their kayak or they will do a slow capsize toward the wave.
The reason I make such a big point about getting your balance point back over your kayak is because of the increased options you are provided. One can side surf toward shore leaning on the force of the wave. However, you are limited to move your kayak in any other direction if you need you paddle for constant support. If you are balanced over your kayak you could initiate a forward or back stroke while moving sideways toward shore. This will allow you a chance to avoid obstacles (rocks, swimmer, surfers, kayakers, etc.) that you may be approaching.
A word of caution regarding side surfing. It is not uncommon for novices to capsize after successfully surviving the impact zone. While traveling sideways the kayaker regains their balance over the boat but forgets to keep the kayak on edge. Sitting straight up while side surfing will mean a capsize.
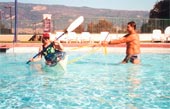
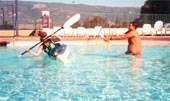
This same feeling can be experienced in any calm water setting. The key is to find a way to knock the kayak out from under the kayaker, while the kayaker is balanced over their boat in the edged position. Instead of knocking the boat out how about pulling it out. Here are the steps to follow: 1) Loosely loop a piece of sling webbing around the boat as seen in figure D. Have the webbing placed so the kayak will move sideways evenly (I have found that point to be around the lap of the kayaker.) I use a fifteen foot piece of one inch tubular climbing webbing as my sling. I tie the ends together to create a seven foot loop. It is vital that the kayak has the freedom to roll as needed within the sling.
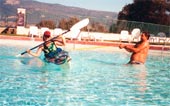
2) Kayaker gets ready for the simulated wave by edging the boat in a ready to brace position. 3) Your partner takes the webbing and quickly pulls the kayak sideways. Notice in figure E the kayakerÕs upper body is exposed to the water just as in Figure B. Since the upper body is over the water and no longer balanced over the boat the brace keeps the kayaker from capsizing.
4) In order to stay upright the kayaker needs to brace while side surfing (figure F) which is the same technique used in the surf in figure C. The longer and faster you keep the kayak moving sideways the more lifting power there is to the paddle blade which will allow the kayaker to practice the feeling of side surfing. It also allows the kayaker time to recover to a balanced position over their kayak.
© Copyright USK